git-mcp
Put an end to code hallucinations! GitMCP is a free, open-source, remote MCP server for any GitHub project
Safety scan
A static text scan, not a guarantee. Select the badge to see what was scanned and every finding.
Badge for your README

Markdown
[](/listings/idosal--git-mcp)HTML
<a href="/listings/idosal--git-mcp"><img src="/api/listings/idosal--git-mcp/badge.svg" alt="findsafeskills safety rating" /></a>Install
Install instructions from the README
As written by the repo's author. findsafeskills has not verified these steps.
Using GitMCP is easy! Simply follow these steps:
Step 1: Choose the type of server you want
Choose one of these URL formats depending on what you want to connect to:
- For GitHub repositories: `gitmcp.io/{owner}/{repo}` - For GitHub Pages sites: `{owner}.gitmcp.io/{repo}` - For a generic tool that supports any repository (dynamic): `gitmcp.io/docs`
Replace `{owner}` with the GitHub username or organization name, and `{repo}` with the repository name.
For your convenience, you can also use the conversion tool on the landing page to format the GitHub URL into an MCP URL!
Step 2: Connect your AI assistant
Select your AI assistant from the options below and follow the configuration instructions:
Connecting Cursor
Update your Cursor configuration file at `~/.cursor/mcp.json`:
   {
     "mcpServers": {
       "gitmcp": {
         "url": "https://gitmcp.io/{owner}/{repo}"
       }
     }
}Connecting Claude Desktop
1. In Claude Desktop, go to Settings > Developer > Edit Config 2. Replace the configuration with:
   {
     "mcpServers": {
       "gitmcp": {
         "command": "npx",
         "args": [
           "mcp-remote",
           "https://gitmcp.io/{owner}/{repo}"
         ]
       }
     }
}Connecting Windsurf
Update your Windsurf configuration file at `~/.codeium/windsurf/mcp_config.json`:
   {
     "mcpServers": {
       "gitmcp": {
         "serverUrl": "https://gitmcp.io/{owner}/{repo}"
       }
     }
}Connecting VSCode
Update your VSCode configuration file at `.vscode/mcp.json`:
   {
     "servers": {
       "gitmcp": {
         "type": "sse",
         "url": "https://gitmcp.io/{owner}/{repo}"
       }
     }
}Connecting Cline
Update your Cline configuration file at `~/Library/Application Support/Code/User/globalStorage/saoudrizwan.claude-dev/settings/cline_mcp_settings.json`:
   {
     "mcpServers": {
       "gitmcp": {
         "url": "https://gitmcp.io/{owner}/{repo}",
         "disabled": false,
         "autoApprove": []
       }
     }
}Connecting Highlight AI
1. Open Highlight AI and click the plugins icon (@ symbol) in the sidebar 2. Click **Installed Plugins** at the top of the sidebar 3. Select **Custom Plugin** 4. Click **Add a plugin using a custom SSE URL**
Plugin name: `gitmcp` SSE URL: `https://gitmcp.io/{owner}/{repo}`
For more details on adding custom MCP servers to HighlightAI, refer to [the documentation](https://docs.highlightai.com/plugins/custom).
Connecting Augment Code
1. Open Augment Code settings 2. Navigate to the MCP section 3. Add a new MCP server with the following details:
Name the MCP server: `git-mcp Docs`
Use this command:
npx mcp-remote https://gitmcp.io/{owner}/{repo}Or use the following configuration:
{
  "mcpServers": {
    "git-mcp Docs": {
      "command": "npx",
      "args": [
        "mcp-remote",
        "https://gitmcp.io/{owner}/{repo}"
      ]
    }
  }
}Connecting Msty AI
1. Open Msty Studio 2. Go to Tools > Import Tools from JSON Clipboard 3. Paste the following configuration:
{
  "mcpServers": {
    "git-mcp Docs": {
      "command": "npx",
      "args": [
        "mcp-remote",
        "https://gitmcp.io/{owner}/{repo}"
      ]
    }
  }
}For more details on configuring MCP servers in Augment Code, visit [the Augment Code documentation](https://docs.augmentcode.com/setup-augment/mcp).
> **Note:** Remember to replace `{owner}` and `{repo}` with the actual GitHub username/organization and repository name. You can also use the dynamic endpoint `https://gitmcp.io/docs` to allow your AI to access any repository on demand.
What was scanned
The files the safety scan read, as written by the repository's author and shown as plain text. Lines with a finding are marked.
README.md · README · 399 lines
View this file on GitHub (read at the repository's current version: the scan did not record which commit it read)
- # GitMCP
- <p align="center">
- <img width="884" alt="image" src="https://github.com/user-attachments/assets/2bf3e3df-556c-49c6-ab7b-36c279d53bba" />
- </p>
- <p align="center">
- <a href="#-what-is-gitmcp">What is GitMCP</a> •
- <a href="#-features">Features</a> •
- <a href="#-getting-started">Getting Started</a> •
- <a href="#-how-it-works">How It Works</a> •
- <a href="#-badge">Badge</a> •
- <a href="#-examples">Examples</a> •
- <a href="#-faq">FAQ</a> •
- <a href="#-privacy">Privacy</a> •
- <a href="#-contributing">Contributing</a> •
- <a href="#-license">License</a>
- </p>
- <div align="center">
- [](https://gitmcp.io/idosal/git-mcp)
- [](https://twitter.com/idosal1)
- [](https://twitter.com/liadyosef)
- </div>
- <div align="center">
- <a href="https://www.pulsemcp.com/servers/idosal-git-mcp"><img src="https://www.pulsemcp.com/badge/top-pick/idosal-git-mcp" width="400" alt="Pulse MCP Badge"></a>
- </div>
- ## 🤔 What is GitMCP?
- **Stop vibe-hallucinating and start vibe-coding!**
- [GitMCP](https://gitmcp.io) is a free, open-source, remote [Model Context Protocol (MCP)](https://docs.anthropic.com/en/docs/agents-and-tools/mcp) server that transforms **any** GitHub project (repositories or GitHub pages) into a documentation hub. It enables AI tools like Cursor to access up-to-date documentation and code, even if the LLM has never encountered them, thereby eliminating code hallucinations seamlessly.
- GitMCP supports **two flavors** -
- * **Specific Repository (`gitmcp.io/{owner}/{repo}` or `{owner}.gitmcp.io/{repo}`):** Use these when you primarily work with a select number of libraries. This ensures your AI assistant always targets the correct project, enhancing security and relevance by preventing access to unintended repositories.
- * **Generic Server (`gitmcp.io/docs`):** Use this for maximum flexibility when you need to switch between different repositories frequently. The AI assistant will prompt you (or decide based on context) which repository to access for each request. Be mindful that this relies on correctly identifying the target repository each time.
- **With GitMCP:**
- * AI assistants access the *latest* documentation and code directly from the source.
- * Get accurate API usage and reliable code examples.
- * Work effectively even with niche, new, or rapidly changing libraries.
- * Significantly reduced hallucinations and improved code correctness.
- For example, this side-by-side comparison shows the result for the same one-shot prompt in Cursor when creating a [three.js](https://github.com/mrdoob/three.js) scene -
- https://github.com/user-attachments/assets/fbf1b4a7-f9f0-4c0e-831c-4d64faae2c45
- ## ✨ Features
- - 😎 **Latest Documentation on ANY GitHub Project**: Grant your AI assistant seamless access to the GitHub project's documentation and code. The built-in smart search capabilities help find exactly what the AI needs without using too many tokens!
- - 🧠 **No More Hallucinations**: With GitMCP, your AI assistant can provide accurate and relevant answers to your questions.
- - ☁️ **Zero Setup**: GitMCP runs in the cloud. Simply add the chosen GitMCP URL as an MCP server in your IDE — no downloads, installations, signups, or changes are required.
- - 💬 **Embedded Chat**: Start quickly by chatting directly with the repository's documentation through our in-browser chat!
- - ✅ **Open, Free, and Private**: GitMCP is open-source and completely free to use. It doesn't collect personal information or store queries. You can even self-host it!
- <video src="https://github.com/user-attachments/assets/2c3afaf9-6c08-436e-9efd-db8710554430"></video>
- ## 🚀 Getting Started
- Using GitMCP is easy! Simply follow these steps:
- ### Step 1: Choose the type of server you want
- Choose one of these URL formats depending on what you want to connect to:
- - For GitHub repositories: `gitmcp.io/{owner}/{repo}`
- - For GitHub Pages sites: `{owner}.gitmcp.io/{repo}`
- - For a generic tool that supports any repository (dynamic): `gitmcp.io/docs`
- Replace `{owner}` with the GitHub username or organization name, and `{repo}` with the repository name.
- For your convenience, you can also use the conversion tool on the landing page to format the GitHub URL into an MCP URL!
- ### Step 2: Connect your AI assistant
- Select your AI assistant from the options below and follow the configuration instructions:
- #### Connecting Cursor
- Update your Cursor configuration file at `~/.cursor/mcp.json`:
- ```json
- {
- "mcpServers": {
- "gitmcp": {
- "url": "https://gitmcp.io/{owner}/{repo}"
- }
- }
- }
- ```
- #### Connecting Claude Desktop
- 1. In Claude Desktop, go to Settings > Developer > Edit Config
- 2. Replace the configuration with:
- ```json
- {
- "mcpServers": {
- "gitmcp": {
- "command": "npx",
- "args": [
- "mcp-remote",
- "https://gitmcp.io/{owner}/{repo}"
- ]
- }
- }
- }
- ```
- #### Connecting Windsurf
- Update your Windsurf configuration file at `~/.codeium/windsurf/mcp_config.json`:
- ```json
- {
- "mcpServers": {
- "gitmcp": {
- "serverUrl": "https://gitmcp.io/{owner}/{repo}"
- }
- }
- }
- ```
- #### Connecting VSCode
- Update your VSCode configuration file at `.vscode/mcp.json`:
- ```json
- {
- "servers": {
- "gitmcp": {
- "type": "sse",
- "url": "https://gitmcp.io/{owner}/{repo}"
- }
- }
- }
- ```
- #### Connecting Cline
- Update your Cline configuration file at `~/Library/Application Support/Code/User/globalStorage/saoudrizwan.claude-dev/settings/cline_mcp_settings.json`:
- ```json
- {
- "mcpServers": {
- "gitmcp": {
- "url": "https://gitmcp.io/{owner}/{repo}",
- "disabled": false,
- "autoApprove": []
- }
- }
- }
- ```
- #### Connecting Highlight AI
- 1. Open Highlight AI and click the plugins icon (@ symbol) in the sidebar
- 2. Click **Installed Plugins** at the top of the sidebar
- 3. Select **Custom Plugin**
- 4. Click **Add a plugin using a custom SSE URL**
- Plugin name: `gitmcp`
- SSE URL: `https://gitmcp.io/{owner}/{repo}`
- For more details on adding custom MCP servers to HighlightAI, refer to [the documentation](https://docs.highlightai.com/plugins/custom).
- #### Connecting Augment Code
- 1. Open Augment Code settings
- 2. Navigate to the MCP section
- 3. Add a new MCP server with the following details:
- Name the MCP server: `git-mcp Docs`
- Use this command:
- ```bash
- npx mcp-remote https://gitmcp.io/{owner}/{repo}
- ```
- Or use the following configuration:
- ```json
- {
- "mcpServers": {
- "git-mcp Docs": {
- "command": "npx",
- "args": [
- "mcp-remote",
- "https://gitmcp.io/{owner}/{repo}"
- ]
- }
- }
- }
- ```
- #### Connecting Msty AI
- 1. Open Msty Studio
- 2. Go to Tools > Import Tools from JSON Clipboard
- 3. Paste the following configuration:
- ```json
- {
- "mcpServers": {
- "git-mcp Docs": {
- "command": "npx",
- "args": [
- "mcp-remote",
- "https://gitmcp.io/{owner}/{repo}"
- ]
- }
- }
- }
- ```
- For more details on configuring MCP servers in Augment Code, visit [the Augment Code documentation](https://docs.augmentcode.com/setup-augment/mcp).
- > **Note:** Remember to replace `{owner}` and `{repo}` with the actual GitHub username/organization and repository name. You can also use the dynamic endpoint `https://gitmcp.io/docs` to allow your AI to access any repository on demand.
- ## ⚙ How It Works
- GitMCP connects your AI assistant to GitHub repositories using the Model Context Protocol (MCP), a standard that lets AI tools request additional information from external sources.
- What happens when you use GitMCP:
- 1. **You provide the GitMCP URL** to your AI assistant (e.g., `gitmcp.io/microsoft/typescript`). GitMCP exposes tools like documentation fetching, smart search, code search, etc.
- 2. **Prompt the AI assistant** on documentation/code-related questions.
- 3. **Your AI sends requests** to GitMCP to use its tools (with your approval).
- 4. **GitMCP executes the AI's request** and returns the requested data.
- 5. **Your AI receives the information** and generates a more accurate, grounded response without hallucinations.
- ### Supported Documentation
- GitMCP currently supports the following documents (in order of priority):
- 1. [llms.txt](https://llmstxt.org)
- 2. AI-optimized version of the project's documentation
- 3. `README.md`/root
- ## 💡 Examples
- Here are some examples of how to use GitMCP with different AI assistants and repositories:
- ### Example 1: Using Windsurf with a specific repository
- For the GitHub repository `https://github.com/microsoft/playwright-mcp`, add `https://gitmcp.io/microsoft/playwright-mcp` as an MCP server to Windsurf.
- **Prompt to Claude:**
- > "How do I use the Playwright MCP"
- Windsurf will pull the relevant documentation from GitMCP to implement the memory feature correctly.
- ### Example 2: Using Cursor with a GitHub Pages site
- For the GitHub Pages site `langchain-ai.github.io/langgraph`, add `https://langchain-ai.gitmcp.io/langgraph` as an MCP server to Cursor.
- **Prompt to Cursor:**
- > "Add memory to my LangGraph agent"
- Cursor will pull the relevant documentation and code from GitMCP to correctly implement the memory feature.
- ### Example 3: Using Claude Desktop with the dynamic endpoint
- You don't have to pick specific repositories. The generic `gitmcp.io/docs` endpoint allows AI to pick the GitHub project on the fly!
- **Prompt to any AI assistant:**
- > "I want to learn about the OpenAI Whisper speech recognition model. Explain how it works."
- Claude will pull the data from GitMCP and answer the question.
- ## 🛠️ Tools
- GitMCP provides AI assistants with several valuable tools to help them access, understand, and query GitHub repositories.
- ### `fetch_<repo-name>_documentation`
- This tool gets the primary documentation from a GitHub repository. It works by retrieving relevant documentation (e.g., `llms.txt`). This gives the AI a good overview of what the project is about
- **When it's useful:** For general questions about a project's purpose, features, or how to get started
- ### `search_<repo-name>_documentation`
- This tool lets the AI search through a repository's documentation by providing a specific search query. Instead of loading all the documentation (which could be very large), it uses intelligent search to find just the relevant parts.
- **When it's useful:** For specific questions about particular features, functions, or concepts within a project
- ### `fetch_url_content`
- This tool helps the AI get information from links mentioned in the documentation. It retrieves the content from those links and converts it to a format the AI can easily read.
- **When it's useful:** When documentation references external information that would help answer your question
- ### `search_<repo-name>_code`
- This tool searches through the actual code in the repository using GitHub's code search. It helps AI find specific code examples or implementation details.
- **When it's useful:** When you want examples of how something is implemented or need technical details not covered in documentation
- > **Note:** When using the dynamic endpoint (`gitmcp.io/docs`), these tools are named slightly differently (`fetch_generic_documentation`, `search_generic_code`, and `search_generic_documentation`) and need additional information about which repository to access.
- ## 📊 Badge
- GitMCP has a badge for your repository's README. It allows users to quickly access your documentation through their IDE or browser (using the embedded chat). It also showcases how many times your documentation has been accessed through GitMCP.
- Example (`idosal/git-mcp`): [](https://gitmcp.io/idosal/git-mcp)
- ### Adding the Badge to Your Repository
- Add the following to your `README.md`:
- ```markdown
- [](https://gitmcp.io/OWNER/REPO)
- ```
- Replace `OWNER` with your GitHub username or organization, and `REPO` with your repository name.
- ### How We Count Views
- Increment for each tool call on the specific repository.
- ### Customizing the Badge
- You can customize the badge's appearance with parameters:
- | Parameter | Description | Default | Example |
- |-----------|-------------|---------|---------|
- | `color` | Color for the badge value | `aquamarine` | `?color=green` |
- | `label` | Badge label | `GitMCP` | `Documentation`
- Please reach out if you need help!
- ## ❓ FAQ
- ### What is the Model Context Protocol?
- The [Model Context Protocol](https://modelcontextprotocol.io/introduction) is a standard that allows AI assistants to request and receive additional context from external sources in a structured manner, enhancing their understanding and performance.
- ### Does GitMCP work with any AI assistant?
- Yes, GitMCP is compatible with any AI assistant supporting the Model Context Protocol, including tools like Cursor, VSCode, Claude, etc.
- ### Is GitMCP compatible with all GitHub projects?
- Absolutely! GitMCP works with any public GitHub repository without requiring any modifications. It prioritizes the `llms.txt` file and falls back to `README.md` or other pages if the former is unavailable. Future updates aim to support additional documentation methods and even generate content dynamically.
- ### Does GitMCP cost money?
- No, GitMCP is a free service to the community with no associated costs.
- ## 🔒 Privacy
- GitMCP is deeply committed to its users' privacy. The service doesn't have access to or store any personally identifiable information as it doesn't require authentication. In addition, it doesn't store any queries sent by the agents. Moreover, as GitMCP is an open-source project, it can be deployed independently in your environment.
- GitMCP only accesses content that is already publicly available and only when queried by a user. GitMCP does not automatically scrape repositories. Before accessing any GitHub Pages site, the code checks for `robots.txt` rules and follows the directives set by site owners, allowing them to opt out. Please note that GitMCP doesn't permanently store data regarding the GitHub projects or their content.
- ## 👥 Contributing
- We welcome contributions, feedback, and ideas! Please review our [contribution](https://github.com/idosal/git-mcp/blob/main/.github/CONTRIBUTING.md) guidelines.
- ### Local Development Setup
- 1. **Clone the repository**
- ```bash
- git clone https://github.com/idosal/git-mcp.git
- cd git-mcp
- ```
- 2. **Install dependencies**
- ```bash
- pnpm install
- ```
- 3. **Run locally for development**
- ```bash
- npm run dev
- # or
- pnpm dev
- ```
- #### Using MCP Inspector for Testing
- 1. Install the MCP Inspector tool:
- ```bash
- npx @modelcontextprotocol/inspector
- ```
- 2. In the inspector interface:
- - Set Transport Type to `SSE`
- - Enter your GitMCP URL (e.g., `http://localhost:5173/docs`)
- - Click "Connect"
- ## 📄 License
- This project is licensed under the [Apache License 2.0](LICENSE).
- ## Disclaimer
- GitMCP is provided "as is" without warranty of any kind. While we strive to ensure the reliability and security of our service, we are not responsible for any damages or issues that may arise from its use. GitHub projects accessed through GitMCP are subject to their respective owners' terms and conditions. GitMCP is not affiliated with GitHub or any of the mentioned AI tools.
- ## Star History
- [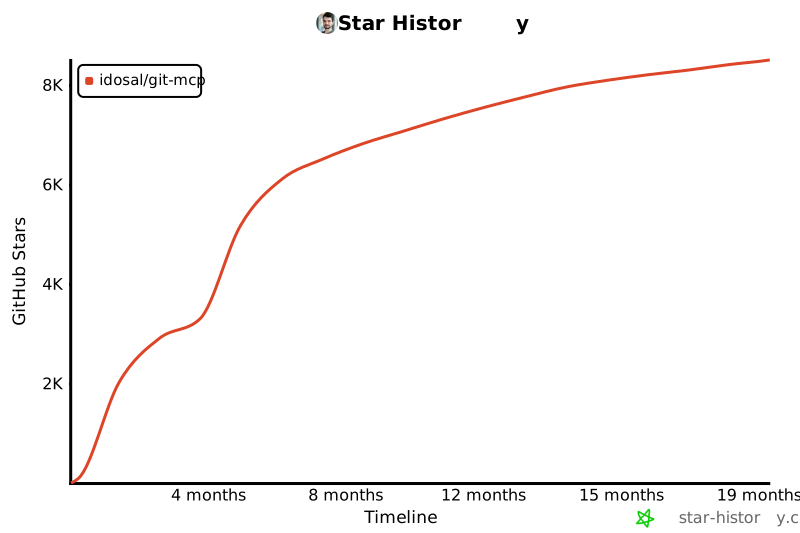](https://www.star-history.com/#idosal/git-mcp&Timeline)
Ratings and comments
Sign in to rate this skill.
Sign inFree to use. If it’s helped, pass it on.