neuro-san-studio
A playground for neuro-san
Safety scan
A static text scan, not a guarantee. Select the badge to see what was scanned and every finding.
Check it deeper on your machine
It has changed since its scan on 11 Nov 2026.
As a Claude Code plugin, install it and then ask Claude Code:
/plugin marketplace add keithmackay/mackayi/plugin install scanskillsafety@mackayiDo a deep scan of https://github.com/cognizant-ai-lab/neuro-san-studio with scanskillsafety
Or from a terminal, clone it and run it:
git clone https://github.com/keithmackay/scanskillsafety-skill ~/.claude/skills/scanskillsafetynode ~/.claude/skills/scanskillsafety/cli.cjs --deep 'https://github.com/cognizant-ai-lab/neuro-san-studio'
It checks the exact commit: every file, its packages against OSV (api.osv.dev), how it compares with this page's scan (findsafeskills.com receives the repository's address), and, if you agree, Claude reading every file with your own Claude subscription. It never runs the code.
Badge for your README

Markdown
[](/listings/cognizant-ai-lab--neuro-san-studio)HTML
<a href="/listings/cognizant-ai-lab--neuro-san-studio"><img src="/api/listings/cognizant-ai-lab--neuro-san-studio/badge.svg" alt="findsafeskills safety rating" /></a>Install
Install instructions from the README
As written by the repo's author. findsafeskills has not verified these steps.
These instructions are for Linux and macOS systems. Please adjust the commands accordingly for Windows.
Install `uv`
[`uv`](https://docs.astral.sh/uv/) is a fast Python package and project manager built by Astral.
Official installation docs: 👉 [https://docs.astral.sh/uv/getting-started/installation/](https://docs.astral.sh/uv/getting-started/installation/)
Create a new Python project
Create a folder for your project:
mkdir my_project
cd my_project
Create a virtual environment, initialize a git repo and install `neuro-san-studio`
uv init
uv venv
source .venv/bin/activate
uv add neuro-san-studio
Initialize neuro-san-studio
Run `ns init` to initialize a Neuro SAN Studio project. `ns` stands for Neuro SAN. You can also use the long command `neuro-san-studio` instead. It will: * let you choose an LLM provider * create a `config` folder with your choice of LLM models and plugins configuration * create an `mcp` folder with a list of MCP tools * create a `registries` folder with a simple agent network and the [Agent Network Designer](#agent-network-designer), so you can start designing your own networks right away * create `coded_tools` and `middleware` folders with the Python code those agent networks need
To learn more about the `ns` command run `ns --help`.
ns init
Which LLM providers do you want to enable?

#  Provider       Default model
1  OpenAI         gpt-5.2 (default)
2  Anthropic      claude-sonnet
3  Google Gemini  gemini-3-flash

Enter numbers separated by commas (default: 1):
**Note:** To access all Neuro SAN Studio capabilities, clone this repository and follow the setup instructions in the [docs/dev_guide.md](docs/dev_guide.md).
Set your LLM API key(s)
1. Set your provider key, e.g. `OPENAI_API_KEY`, `ANTHROPIC_API_KEY` or `GOOGLE_API_KEY` (or create a `.env` file in the current directory). See [docs/api_key.md](docs/api_key.md) for details and other providers.
export OPENAI_API_KEY="XXX"
2. Check your LLM API keys are correctly configured:
```bash ns check-llm-keys ```
3. Check your `config/llm_config.hocon` is working:
```bash ns check-config ```
If the configuration is valid you will get a `hello` response from the configured LLMs.
Import agent networks
`ns init` already installs the Agent Network Designer, so you can start building right away. Use `ns import` to add any of the other agent network examples that ship with `neuro-san-studio`.
Run it with no arguments to pick from an interactive list:
ns import
Or name a group or a single network directly:
ns import basic         # every network in the "basic" group
ns import hello_world   # a single network
Each imported network brings its dependencies with it -- coded tools, middleware, sub-networks -- and is registered in `registries/manifest.hocon`. A running server picks it up within a few seconds.
See [`docs/cli/import.md`](docs/cli/import.md) for the full set of options.
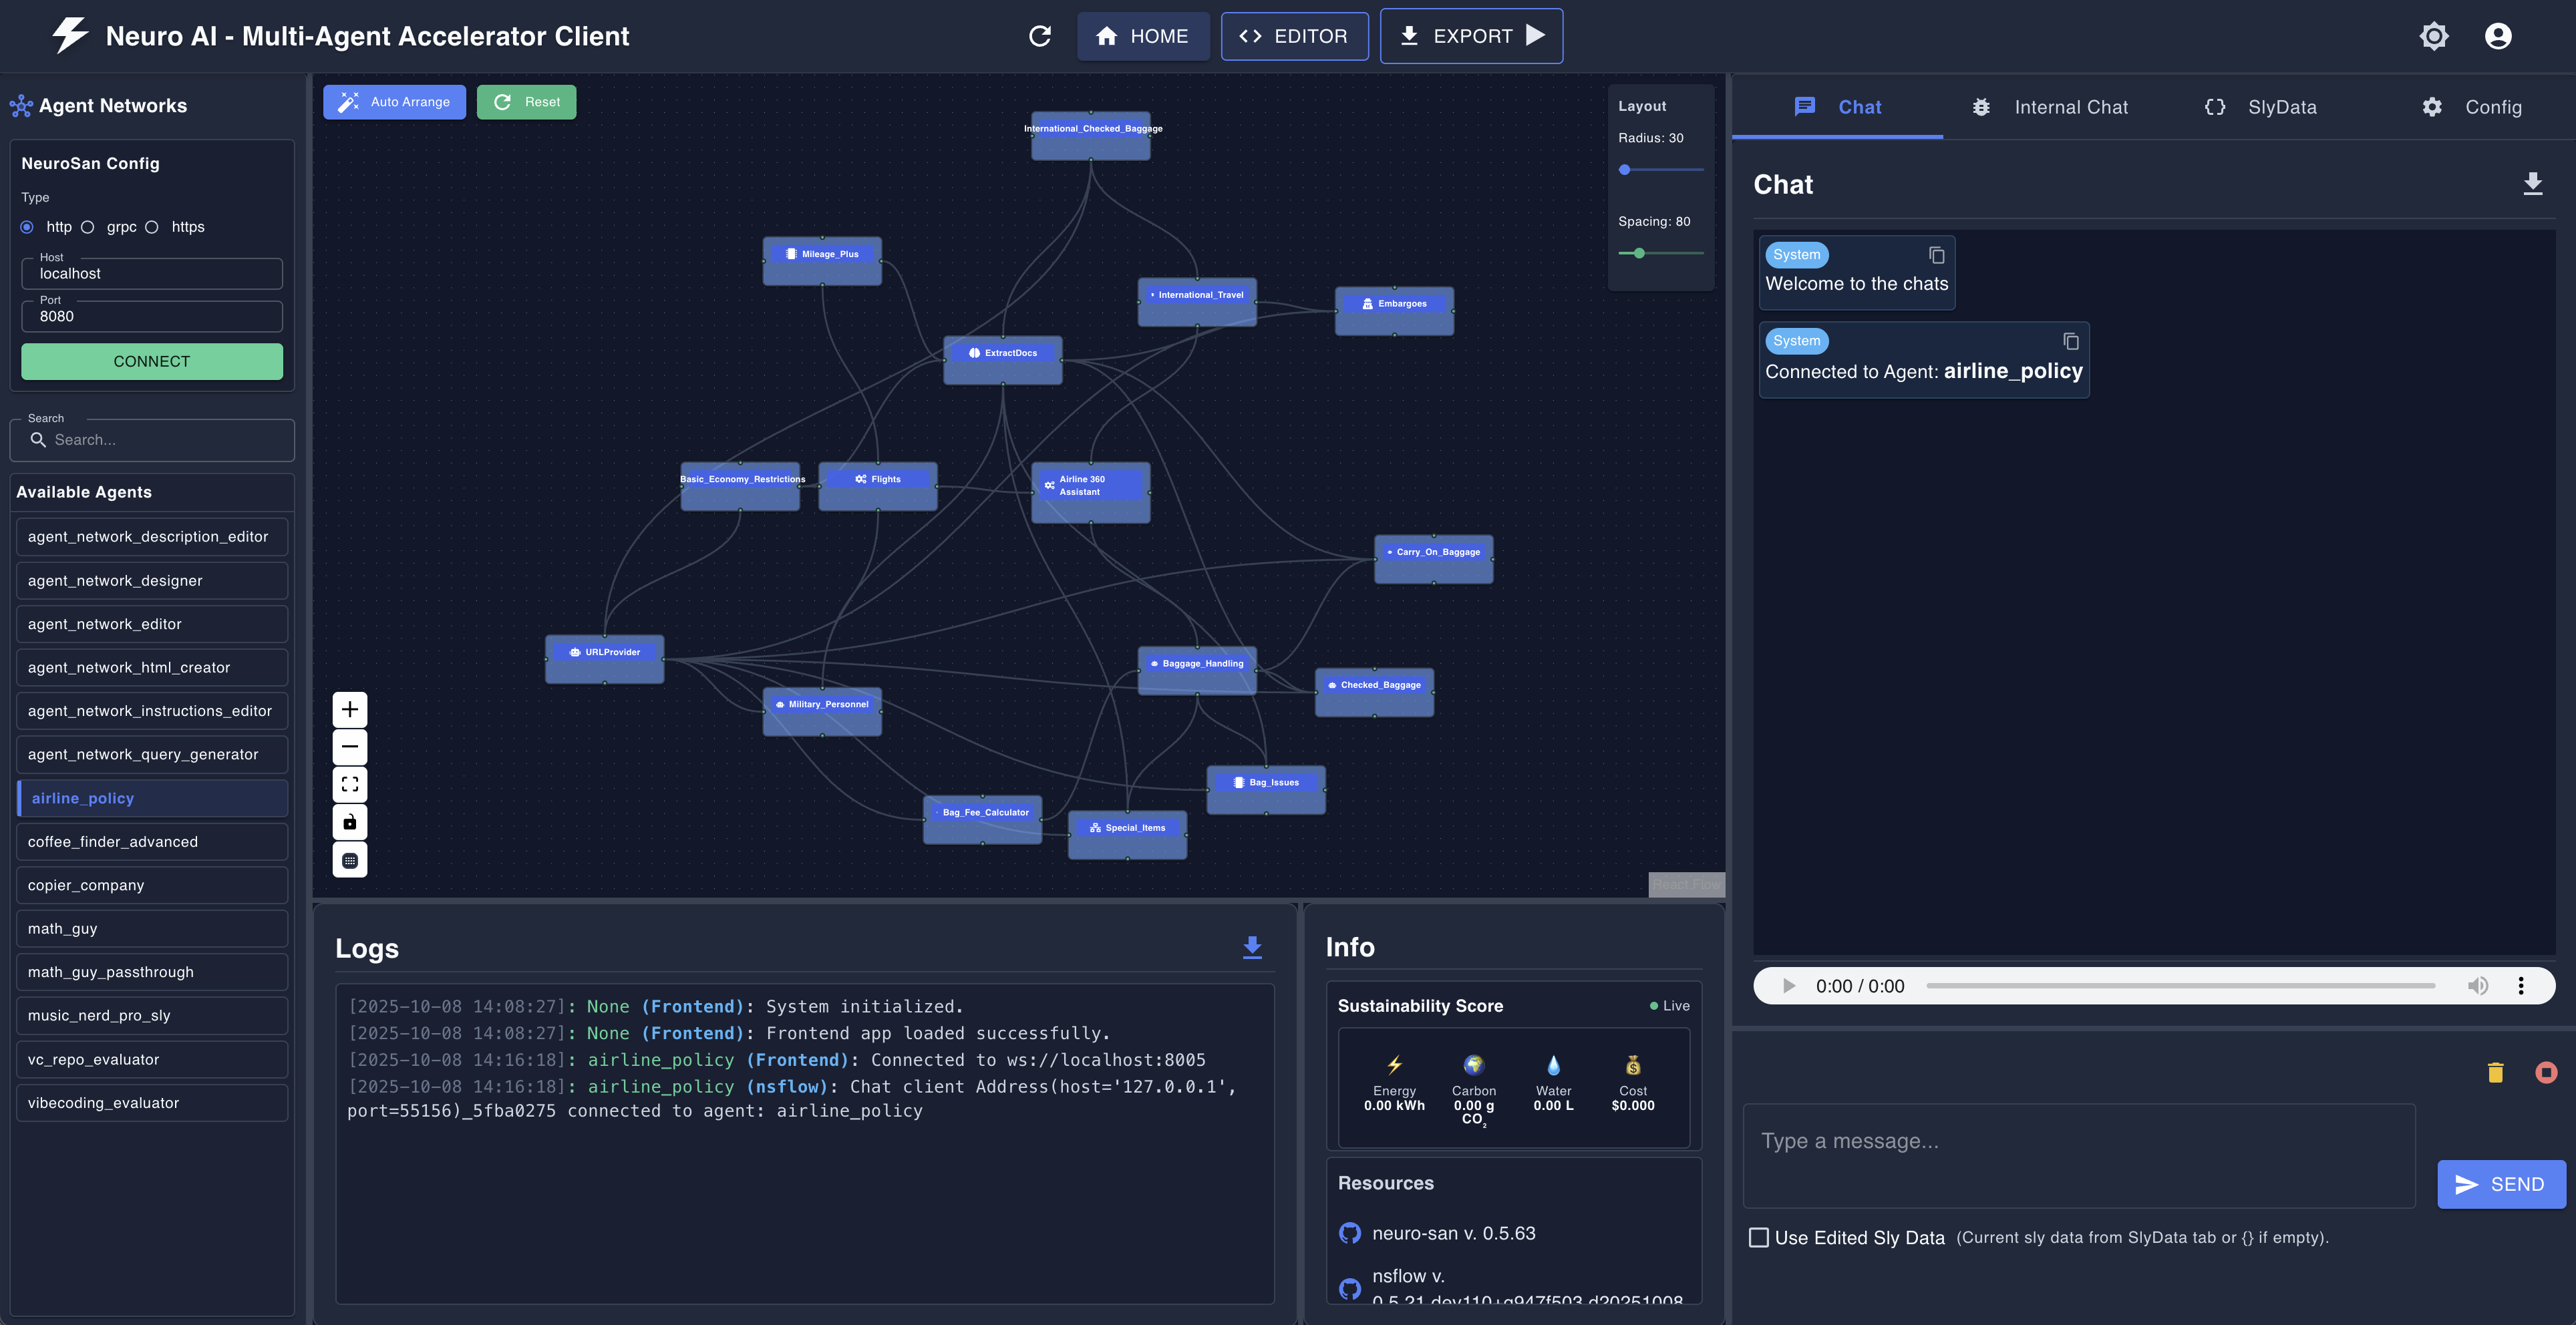
Start the developer UI
You can start a `neuro-san` server and the `nsflow` UI with the `ns run` command:
ns run
The Neuro SAN server listens on `localhost:8080`.
The nsflow UI is served at [http://localhost:4173/](http://localhost:4173/).
Logs land under `logs/` (`server.log`, `nsflow.log`, `thinking_dir/`).
Screenshot:
Agent Network Designer
Use the Agent Network Designer to create your own agent network.
1. From the `nsflow` UI, click the `NEW` button at the top, center of the screen. 2. In the new window that opens, type your prompts in the text box in the bottom right corner of the screen. Then Agent Network Designer: * Creates the agents * Links them together * Writes instructions for each agent * Generates a few sample queries you can ask this agent network * Saves the agent network in the `registries/generated` folder
What was scanned
The files the safety scan read, as written by the repository's author and shown as plain text. Lines with a finding are marked.
README.md · README · 454 lines
View this file on GitHub (read at the repository's current version: the scan did not record which commit it read)
This file has changed since it was scanned, so this is not exactly the text that was scanned, and no line is marked. The findings are listed with the safety scan above.
- <!-- pyml disable-next-line first-line-heading -->
- <!-- Badges -->
- <!-- pyml disable-next-line no-inline-html -->
- <p align="center">
- <!-- GitHub Stats -->
- <img src="https://img.shields.io/github/stars/cognizant-ai-lab/neuro-san-studio?style=social" alt="GitHub stars">
- <img src="https://img.shields.io/github/forks/cognizant-ai-lab/neuro-san-studio?style=social" alt="GitHub forks">
- <img src="https://img.shields.io/github/watchers/cognizant-ai-lab/neuro-san-studio?style=social" alt="GitHub watchers">
- </p>
- <p align="center">
- <!-- GitHub Info -->
- <img src="https://img.shields.io/github/last-commit/cognizant-ai-lab/neuro-san-studio" alt="Last Commit">
- <img src="https://img.shields.io/github/issues/cognizant-ai-lab/neuro-san-studio" alt="Issues">
- <img src="https://img.shields.io/github/issues-pr/cognizant-ai-lab/neuro-san-studio" alt="Pull Requests">
- <a href="https://github.com/cognizant-ai-lab/neuro-san-studio/blob/main/LICENSE.txt"><img alt="License"
- src="https://img.shields.io/github/license/cognizant-ai-lab/neuro-san-studio"></a>
- <a href="https://pepy.tech/projects/neuro-san-studio"><img alt="PyPI Downloads"
- src="https://static.pepy.tech/badge/neuro-san-studio" /></a>
- <a href="https://pypi.org/project/neuro-san-studio/">
- <img alt="neuro-san-studio@PyPI" src="https://img.shields.io/pypi/v/neuro-san-studio.svg?style=flat-square"></a>
- <a href="https://deepwiki.com/cognizant-ai-lab/neuro-san-studio">
- <img src="https://img.shields.io/badge/Ask-DeepWiki-blue" alt="Ask DeepWiki: Neuro SAN Studio" /></a>
- </p>
- <!-- pyml disable-next-line no-inline-html -->
- <p align="center">
- <!-- Neuro SAN Stats -->
- Neuro SAN library <br>
- <a href="https://github.com/cognizant-ai-lab/neuro-san"><img alt="GitHub Repo"
- src="https://img.shields.io/badge/GitHub-Repo-green.svg" /></a>
- <img src="https://img.shields.io/github/commit-activity/m/cognizant-ai-lab/neuro-san" alt="commit activity">
- <a href="https://github.com/cognizant-ai-lab/neuro-san/blob/main/LICENSE.txt"><img alt="License"
- src="https://img.shields.io/github/license/cognizant-ai-lab/neuro-san"></a>
- <a href="https://pepy.tech/projects/neuro-san"><img alt="PyPI Downloads"
- src="https://static.pepy.tech/badge/neuro-san" /></a>
- <a href="https://pypi.org/project/neuro-san/">
- <img alt="neuro-san@PyPI" src="https://img.shields.io/pypi/v/neuro-san.svg?style=flat-square"></a>
- <a href="https://deepwiki.com/cognizant-ai-lab/neuro-san">
- <img src="https://img.shields.io/badge/Ask-DeepWiki-blue" alt="Ask DeepWiki: Neuro SAN" /></a>
- </p>
- # Neuro SAN Studio
- **Your launchpad for building intelligent multi-agent systems.** Neuro SAN Studio is a hands-on playground for the
- [Neuro SAN](https://github.com/cognizant-ai-lab/neuro-san) framework, featuring ready-to-run examples, tutorials, and
- tools that let you design, test, and deploy sophisticated agent networks in minutes—not months. Whether you're a
- researcher exploring adaptive AI systems, a developer prototyping production solutions, or a domain expert configuring
- agents without code, this studio handles the orchestration complexity so you can focus on solving real problems.
- <!-- pyml disable-next-line no-inline-html -->
- <h3 align="center">
- 🚀 Try Neuro SAN now, no install required:
- <a href="https://neuro-san.evolution.ml/">https://neuro-san.evolution.ml/</a>
- </h3>
- <!-- pyml disable-next-line no-inline-html -->
- <p align="center">
- <a href="https://neuro-san.evolution.ml/"><img alt="Launch Neuro SAN"
- src="https://img.shields.io/badge/Launch_Neuro_SAN-2ea44f?style=for-the-badge" /></a>
- </p>
- <!-- pyml disable-next-line no-inline-html -->
- <p align="center">
- This is a Bring Your Own Key (BYOK) instance, so you will need an API key from OpenAI, Anthropic or Gemini.
- </p>
- ---
- <!-- pyml disable-next-line no-inline-html -->
- <p align="center">
- Neuro SAN is the open-source library powering the Cognizant Neuro® AI Multi-Agent Accelerator, allowing domain experts,
- researchers and developers to immediately start prototyping and building agent networks across any industry vertical.
- </p>
- ## What is Neuro SAN?
- [**Neuro AI system of agent networks (Neuro SAN)**](https://github.com/cognizant-ai-lab/neuro-san) is an open-source,
- data-driven multi-agent orchestration framework designed to simplify and accelerate the development of collaborative AI
- systems. It allows users—from machine learning engineers to business domain experts—to quickly build sophisticated
- multi-agent applications without extensive coding, using declarative configuration files (in HOCON format).
- Neuro SAN enables multiple large language model (LLM)-powered agents to collaboratively solve complex tasks, dynamically
- delegating subtasks through adaptive inter-agent communication protocols. This approach addresses the limitations inherent
- to single-agent systems, where no single model has all the expertise or context necessary for multifaceted problems.
- <!-- pyml disable line-length -->
- | Build a multi-agent network in minutes | Neuro SAN overview | Quick start |
- |-------------------------------------------------------------------------------------|----------------------------------------------------------------------------------------|--------------------------------------------------------------------------|
- | [](https://www.youtube.com/watch?v=wGxvPBN34Mk) | [](https://www.youtube.com/watch?v=NmniQWQT6vI) | [](https://youtu.be/gfem8ylphWA) |
- <!-- pyml enable line-length -->
- ---
- ### ✨ Key Features
- * **🗂️ Data-Driven Configuration**: Entire agent networks are defined declaratively via simple HOCON files, empowering
- technical and non-technical stakeholders to design agent interactions intuitively.
- * **🔀 Adaptive Communication ([AAOSA Protocol](https://arxiv.org/abs/cs/9812015))**: Agents autonomously determine how
- to delegate tasks, making interactions fluid and dynamic with decentralized decision-making.
- * **🔒 Sly-Data**: Sly Data facilitates safe handling and transfer of sensitive data between agents without exposing it
- directly to any language models.
- * **🧩 Dynamic Agent Network Designer**: Includes a meta-agent called the Agent Network Designer – essentially, an agent
- that creates other agent networks. Provided as an example with Neuro SAN, it can take a high-level description of a
- use-case as input and generate a new custom agent network for it.
- * **🛠️ Flexible Tool Integration**: Integrate custom Python-based "coded tools," APIs, databases, and even external
- agent ecosystems (Agentforce, Agentspace, CrewAI, MCP, A2A agents, LangChain tools and more) seamlessly into your agent workflows.
- * **📈 Robust Traceability**: Detailed logging, tracing, and session-level metrics enhance transparency, debugging, and
- operational monitoring.
- * **🌐 Extensible and Cloud-Agnostic**: Compatible with a wide variety of LLM providers (OpenAI, Anthropic, Azure, Ollama,
- etc.) and deployable in diverse environments (local machines, containers, or cloud infrastructures).
- ---
- ### Use Cases
- Here are a few examples of use-cases that have been implemented with Neuro SAN.
- For more examples, check out [docs/examples.md](docs/examples.md).
- <!-- pyml disable no-inline-html -->
- <table>
- <thead>
- <tr>
- <th>Agent Network</th>
- <th>Use-Case</th>
- <th>Description</th>
- </tr>
- </thead>
- <tbody>
- <tr>
- <td>🧬 <strong>Agent Network Designer</strong></td>
- <td>Automated generation of multi-agent HOCON configurations.</td>
- <td>Generates complex multi-agent configurations from natural language input, simplifying the creation of intricate
- agent workflows.</td>
- </tr>
- <tr>
- <td>🛫 <strong>Airline Policy Assistance</strong></td>
- <td>Customer support for airline policies.</td>
- <td>Agents interpret and explain airline policies, assisting customers with inquiries about baggage allowances, cancellations,
- and travel-related concerns.</td>
- </tr>
- <tr>
- <td>🏦 <strong>Banking Operations & Compliance</strong></td>
- <td>Automated financial operations and regulatory compliance.</td>
- <td>Automates tasks such as transaction monitoring, fraud detection, and compliance reporting, ensuring adherence to
- regulations and efficient routine operations.</td>
- </tr>
- <tr>
- <td>🛍️ <strong>Consumer Packaged Goods (CPG)</strong></td>
- <td>Market analysis and product development in CPG.</td>
- <td>Gathers and analyzes market trends, customer feedback, and sales data to support product development and strategic
- marketing.</td>
- </tr>
- <tr>
- <td>🛡️ <strong>Insurance Agents</strong></td>
- <td>Claims processing and risk assessment.</td>
- <td>Automates claims evaluation, assesses risk factors, ensures policy compliance, and improves claim-handling efficiency
- and customer satisfaction.</td>
- </tr>
- <tr>
- <td>🏢 <strong>Intranet Agents</strong></td>
- <td>Internal knowledge management and employee support.</td>
- <td>Provides employees with quick access to policies, HR, and IT support, enhancing internal communications and resource
- accessibility.</td>
- </tr>
- <tr>
- <td>🛒 <strong>Retail Operations & Customer Service</strong></td>
- <td>Enhancing retail customer experience and operational efficiency.</td>
- <td>Handles customer inquiries, inventory management, and supports sales processes to optimize operations and service
- quality.</td>
- </tr>
- <tr>
- <td>📞 <strong>Telco Network Support</strong></td>
- <td>Technical support and network issue resolution.</td>
- <td>Diagnoses network problems, guides troubleshooting, and escalates complex issues, reducing downtime and enhancing
- customer service.</td>
- </tr>
- <tr>
- <td>📞 <strong>Therapy Vignette Supervision</strong></td>
- <td>Generates treatment plan for a given therapy vignette.</td>
- <td>A good example of using multiple different expert agents working together to come up with a single plan.</td>
- </tr>
- </tbody>
- </table>
- <!-- pyml enable no-inline-html -->
- And many more: check out [docs/examples.md](docs/examples.md).
- ---
- ## High level Architecture
- <!-- pyml disable no-inline-html -->
- <p align="left">
- <img src="./docs/images/neuroai_arch_diagram.png" alt="neuro-san architecture" width="800"/>
- </p>
- <!-- pyml enable no-inline-html -->
- ---
- ## Install
- These instructions are for Linux and macOS systems. Please adjust the commands accordingly for Windows.
- ### Install `uv`
- [`uv`](https://docs.astral.sh/uv/) is a fast Python package and project manager built by Astral.
- Official installation docs:
- 👉 [https://docs.astral.sh/uv/getting-started/installation/](https://docs.astral.sh/uv/getting-started/installation/)
- ### Create a new Python project
- Create a folder for your project:
- ```bash
- mkdir my_project
- cd my_project
- ```
- Create a virtual environment, initialize a git repo and install `neuro-san-studio`
- ```bash
- uv init
- uv venv
- source .venv/bin/activate
- uv add neuro-san-studio
- ```
- ### Initialize neuro-san-studio
- Run `ns init` to initialize a Neuro SAN Studio project. `ns` stands for Neuro SAN. You can also use the long command
- `neuro-san-studio` instead. It will:
- * let you choose an LLM provider
- * create a `config` folder with your choice of LLM models and plugins configuration
- * create an `mcp` folder with a list of MCP tools
- * create a `registries` folder with a simple agent network and the
- [Agent Network Designer](#agent-network-designer), so you can start designing your own networks right away
- * create a `coded_tools` folder with the Python code those agent networks need
- * create an empty `middleware` folder for middleware you add later
- To learn more about the `ns` command run `ns --help`.
- ```bash
- ns init
- ```
- ```bash
- Which LLM providers do you want to enable?
- # Provider Default model
- 1 OpenAI gpt-5.2 (default)
- 2 Anthropic claude-sonnet
- 3 Google Gemini gemini-3-flash
- Enter numbers separated by commas (default: 1):
- ```
- **Note:** To access all Neuro SAN Studio capabilities, clone this repository and follow the setup instructions in the
- [docs/dev_guide.md](docs/dev_guide.md).
- ### Set your LLM API key(s)
- 1. Set your provider key, e.g. `OPENAI_API_KEY`, `ANTHROPIC_API_KEY` or `GOOGLE_API_KEY`
- (or create a `.env` file in the current directory).
- See [docs/api_key.md](docs/api_key.md) for details and other providers.
- ```bash
- export OPENAI_API_KEY="XXX"
- ```
- 2. Check your LLM API keys are correctly configured:
- ```bash
- ns check-llm-keys
- ```
- 3. Check your `config/llm_config.hocon` is working:
- ```bash
- ns check-config
- ```
- If the configuration is valid you will get a `hello` response from the configured LLMs.
- ### Import agent networks
- `ns init` already installs the Agent Network Designer, so you can start building right away.
- Use `ns import` to add any of the other agent network examples that ship with `neuro-san-studio`.
- Run it with no arguments to pick from an interactive list:
- ```bash
- ns import
- ```
- Or name a group or a single network directly:
- ```bash
- ns import basic # every network in the "basic" group
- ns import hello_world # a single network
- ```
- Each imported network brings its dependencies with it -- coded tools, middleware, sub-networks -- and is registered in
- `registries/manifest.hocon`. A running server picks it up within a few seconds.
- See [`docs/cli/import.md`](docs/cli/import.md) for the full set of options.
- ### Start the developer UI
- You can start a `neuro-san` server and the `nsflow` UI with the `ns run` command:
- ```bash
- ns run
- ```
- The Neuro SAN server listens on `localhost:8080`.
- The nsflow UI is served at
- [http://localhost:4173/](http://localhost:4173/).
- Logs land under `logs/` (`server.log`, `nsflow.log`, `thinking_dir/`).
- Screenshot:
- 
- ### Agent Network Designer
- Use the Agent Network Designer to create your own agent network.
- 1. From the `nsflow` UI, click the `NEW` button at the top, center of the screen.
- 
- 2. In the new window that opens, type your prompts in the text box in the bottom right
- corner of the screen. Then Agent Network Designer:
- * Creates the agents
- * Links them together
- * Writes instructions for each agent
- * Generates a few sample queries you can ask this agent network
- * Saves the agent network in the `registries/generated` folder
- 3. Once the Agent Network Designer is done and comes back with an answer in the chat window,
- you can continue the design by asking it to make changes
- 4. Once you're happy with the design, test it! Click the blue `Launch` button at the top
- center of the screen. It opens a new window from which you can chat with the agent network.
- 5. If you want to make modifications, go back to the editor window and ask for changes.
- 6. You can also edit any agent network by clicking the pen icon next to its name in the main window.
- ### Import a project from a file / Export to a file
- You can import a project from a .hocon file or from a zip file using the `ns import <PATH>`.
- ```bash
- ns import ~/Downloads/my_project.hocon
- ```
- Similarly, you can export an agent network and all its dependencies using the `ns export` command:
- ```bash
- ns export my_project.hocon
- ```
- See [`docs/cli/export.md`](docs/cli/export.md) for details.
- ### Command reference
- <!-- pyml disable line-length -->
- | Command | Purpose | Key flags |
- |---------------------|------------------------------------------------------------------|---------------------------------------------------------------------------------------------------------------------------------------------------------------------------------|
- | `ns init` | Scaffold a starter project in the current dir. | `--providers openai,anthropic,google` |
- | `ns run` | Start the Neuro SAN server and nsflow UI. | `--server-host`, `--server-http-port`, `--nsflow-port`, `--log-level`, `--client-only`, `--server-only` |
- | `ns chat` | Chat with an agent network directly (no server needed). | Positional: agent name, `--connection`, `--host`, `--port`, `--one-shot`, `--list`. |
- | `ns import` | Import agent networks into the current project. | Positional: space-separated group names, network names, or `all`; or local `.hocon` / `.zip` paths (don't mix the two). `--force` to overwrite. Omit args for interactive mode. |
- | `ns export` | Bundle a network from the current project into a shareable file. | Positional: network name (e.g. `music_nerd` or `basic/music_nerd`). `-o` / `--output` to set the output path. Omit args for interactive picker. |
- | `ns check-llm-keys` | Validate LLM API keys / env vars. | `--tier 1` (placeholder), `--tier 2` (format), `--tier 3` (live API call, default) |
- | `ns check-config` | Validate the LLM configurations in a HOCON file. | `--hocon-path` (defaults to `config/llm_config.hocon`) |
- | `ns validate` | Validate a network file and load its coded tools and middleware. | Positional: HOCON path. `--verbose`, `--manifest`, `--external-agents`, `--registry-dir`. References to other networks (`/name`) are checked against the networks served by the manifest. |
- <!-- pyml enable line-length -->
- Use `ns <command> --help` for the full flag list of any subcommand.
- ---
- ## User guide
- Ready to dive in? Check out the [user guide](docs/user_guide.md) for a detailed overview of the neuro-san library
- and its features.
- ---
- ## Tutorial
- For a detailed tutorial, refer to [docs/tutorial.md](docs/tutorial.md).
- ---
- ## Examples
- For examples of agent networks, check out [docs/examples.md](docs/examples.md).
- ---
- ## Developer Guide
- For local development setup and contribution instructions, see the [docs/dev_guide.md](docs/dev_guide.md).
- ---
- ## Community Projects
- ### Applications
- * [Climate Change](https://github.com/cognizant-ai-lab/neuro-san-cc):
- a tool to answer questions about COP, the Paris Agreement or the Kyoto Protocol using UNFCCC documents.
- * [Enterprise Access Portal](https://github.com/M-Elsaied/enterprise-access-portal):
- an AI-powered multi-agent system for managing enterprise application access requests and IT operations.
- * [F1 fans eval](https://github.com/deepsaia/f1-fan-eval):
- an app that evaluates F1 fan submissions about why they are the biggest F1 fans.
- * [PDF Knowledge Assistant](https://github.com/M-Elsaied/neuro-san-studio/tree/pdf-knowledge-base/apps/pdf_knowledge_assistant):
- a Flask web app that queries PDFs using RAG with topic-based long-term memory synthesis across documents.
- * [Loopy Agents](https://github.com/babakatwork/loopy_agent):
- run Neuro SAN agents continuously or on triggers through a separate service, with asynchronous messaging.
- * [Annual Report Reader](https://github.com/shrushtiimehta/neuro-san-annual-report-reader):
- analyzes a LinkedIn profile and delivers a personalized summary of Cognizant's 2024 Annual Report,
- surfacing content most relevant to the user's industry and seniority level.
- * [Tochiro File Organizer](https://github.com/ofrancon/tochiro):
- a macOS file organization assistant with a dedicated UI to analyze a folder,
- create a plan for moving the files, ask for approval and execute the moves.
- * [Legacy Business-Rule Extractor](https://github.com/Sivakumarraj/neuro-san-legacy-analyzer):
- a 6-agent network that extracts business rules from legacy COBOL, Java, and PL/SQL code,
- pairing deterministic CodedTool parsers with LLM agents to produce a modernization-ready
- specification document.
- ### Utilities
- * [Neuro SAN Web Client](https://github.com/cognizant-ai-lab/neuro-san-web-client):
- a basic Flask web client interface for Neuro SAN.
- * [Neuro SAN Slack app](./apps/slack/README.md)
- a Slack integration that lets you interact with Neuro SAN directly from your workspace.
- ---
- ## Links
- * Website: [Cognizant AI Lab](https://www.cognizant.com/us/en/ai-lab)
- * YouTube: [Decision AI](https://www.youtube.com/@decision-ai)
- * X: [@cognizantailab](https://x.com/cognizantailab)
- * LinkedIn: [Cognizant AI Lab](https://www.linkedin.com/showcase/cognizant-ai-lab)
- * Amazon Marketplace: [Cognizant Neuro SAN](https://aws.amazon.com/marketplace/pp/prodview-z246c4x7j3xb6)
- * Azure Marketplace: [Cognizant Neuro SAN](https://marketplace.microsoft.com/en-us/product/virtual-machine/cognizant.cognizant_neurosanai-application)
- ---
- ## More details
- For more information, check out the [Cognizant AI Lab Neuro SAN landing page](https://www.cognizant.com/us/en/ai-lab/neuro-san).
Ratings and comments
Sign in to rate this skill.
Sign inFree to use. If it’s helped, pass it on.